About Contact
Contact management is a digital method to
store data and information’s about the companies or the customers you deal
with. It helps you to grow and diversify your customer base. Contact
handles basic information, such as names, phone numbers and email addresses. It
can also track fundamental interactions between the company and the contact and
keep track of important calendar events.
Note: The basic step you must undergo is to create a customer. There are two kinds where the customer is GST customer or non-GST customer. If the customer is a GST customer, we use B2C customer if not we use B2B customer. Follow the guidelines to learn, how to use the contact section.
B2B Customer
Business-to-business (B2B) is the part which deals between a company and
individual consumers, where commercial transactions are made in supply chain,
for purchasing or supplying raw materials to other companies
Steps to use B2B
1. Get started by making right click on B2B Customer, to add
a new customer in contact section. (Ref: Img 1)
Img 1:
2. B2B Customer
Master page will be opened with the basic details, accounting details,
contact person with including billing and shipping address, which must be
filled about customer. (Ref: Img 2)
Img 2:
3. In Basic Details section fill the “Company Name” in the given required text box, it represents the customers company name. Next fill the Company’s Print Name which must be printed in the print form.
Note: If the company’s name is
same as the company’s print name make a tic in “As Company Name” box.
The boxes with ‘*’ symbol are mandatory (it must be filled compulsory)
4. After entering the
company name and company’s print name, fill the department section.
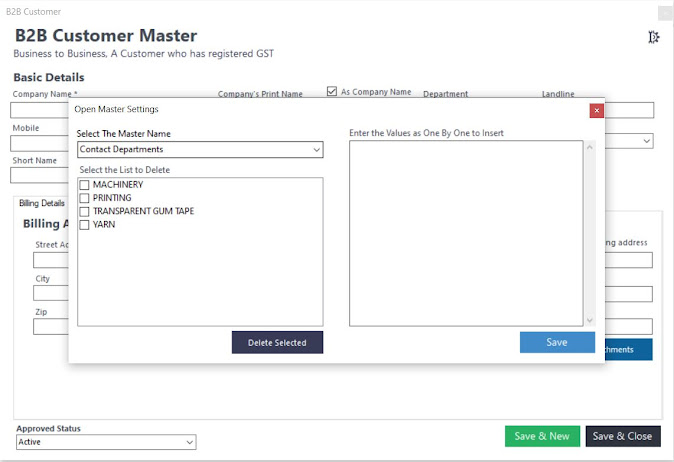
Department is the place where the specific list of divisions of the company can be entered. To create a new list item just click the down
arrow key. A page will appear where you can enter the new division. Type the name of item to be added in the place of right-side box and click save. (Ref: Img 3)
Img :3
5. The value entered in the right-side box will be added in the list of items(Ref: Img 4).
6. If you want to delete the list of items, select the required items and click Delete Selected option(Ref: Img 5)
Img :5
7.
The selected list of items will be deleted permanently, so please make sure the
selected list of items which must be deleted (Ref: Img6). Click Save option
after deleting the selected list of items.
Img:6
8. Enter the Landline number and Mobile number through which the customer can be contacted with.
9. Fill the customer’s E-Mail id, please fill the id
with the correct extension (eg: @gmail.com, @yahoo.com etc...). E-Mail is the
source where the required person or company can be contacted.
10. As a next step enter the customers GST IN number.
Note: GST is total of 15
digits, in which the first two digits represent
the State Code and the following next 10 digits represent the PAN of the
applicant.
11. Select the Contact Type of
the customer whether he/she is a customer or supplier or both customer and
supplier or contractor or transporter (Ref:Img 7)
12. Enter the Short form of the company’s name in Short Name box. Then enter the Contact Person Name to whom the person is to be contacted with, for clearing any issues or doubts.
13. Enter the WhatsApp No to
have a contact with the customer. Please make sure that the WhatsApp number is entered with 91
at the beginning. (e.g.: 91 9999999999)
Notes:
Please Make sure that WhatsApp number section must be filled with digits and
not with alphabets or any other special character like ‘*, & %, $, etc.…’
The E-Mail id must be filled in proper format without making any mistakes.
14. Billing Address represents the location of customer or company to whom the product is billed with. Here please
enter the street address of the location and city and state name where its
situated. Enter the zip code without making any mistakes and enter the country
name.
15. Shipping Address is the
place or the location of the customer/ company where the purchased product to be shipped. Here please enter the street address of the shipping place and city,
state name where its situated. Enter the zip code without any mistakes and
enter the country name.
Note: If the
shipping address is same as the billing address then make a tic in the text box
mentioned as “Use the billing address” above the shipping address section.
(Ref:Img 8)
16. In the need of attaching any files or any sample pictures “My Attachment” text box which is below the shipping address section is used. To attach the files, make a click on the symbol near the My Attachment box. It will lead you to the file manager where you can select your required file to be attached with. The attached files can be referred by clicking “My Attachment” section (Ref: Img 9)
17. Please make sure that the Approved
Status is filled, it is based on the customer whether the customer is active,
inactive, blocked or pending with work (Ref: Img 9)
Note: Make
sure that all the details in billing address and shipping address are filled
correctly with city and state name. Please be sure with the zip code is
being filled correctly without any mistakes.
18. After filling the Billing Details go to Accounting Details.
19. Enter the amount you want to
pay for your supplier for the received product in the “Payable Opening
Balance” section
20. Enter the amount of balance you received from the customer in the “Receivable Opening Balance”
21. Enter the amount up to which
the customer is being limited with his credit, in the “Credit Limit” section.
22. The Discount percentage for the customer can be entered in the “Discount%” text box.
Img:10
23.Enter the price list of the customer /person in the Price List text box.
Note: To create the price list Click here -> Creat Pricelist
24. Enter the Person’s name who manages the entire account in the “Account Manager” text box. Enter the agent’s name who handles the work in company in the required “Agent Name” text box (Ref: Img 10). If you want to add new agent, just click the down arrow key and add the name as same as the process followed in adding new list in department section (Ref: Img 3,4,5,6)
25. Enter the time period of days up to when the customer is
allowed to pay the remaining amount.
Enter the days in “credit days” text box.
26. TCS is the place
where you enter the percentage of amount to be paid to the government.eg., if
you purchase a product above Rs:50,0000 you must pay a certain percentage of
amount to the government as a tax. Here you enter that percentage in “TCS” text box.
27. Enter the Permanent Account Number in the “PAN”.
Note:
Make sure that the Permanent Account Number must be entered correctly which consists of 15 digits, without
making any mistakes.
28. For other additional details enter the information’s in
the required “Other Details” text box in the right side
29. After completing the Accounting Details section, Click Other
Details Section.
30. Enter the customers website where the data and information about a particular company can be known(Ref:Img 11).
31. The rating of the customer depends
upon the score of their performance. And the ratings rank from 1-5 stars and enter the ratings in “Rating”
text box (Ref: Img 11)
32. Loyalty
points are a type of
currency that a company offers within a loyalty scheme and that must be entered in “Loyalty Points” text box (Ref: Img 11).
Img:11

33. Here you can add the extra text boxes like transport name,goods etc..,by using below coding in devx in company profile,
<ContactSettings>
<FieldA1>Transport
Name#@distinct.a1</FieldA1>
<FieldA2>Goods
To#@distinct.a2</FieldA2>
<FieldA3>FieldA3#@distinct.a3</FieldA3>
<FieldA4>FieldA4#@distinct.a4</FieldA4>
<MyContactHideColumns>Display
Name,Country</MyContactHideColumns>
</ContactSettings>
Img :12
Img :13
Img: 14
Img:15

36. Enter the Designation position of the person in the
company you contact with. Then enter the Name of the person and Mobile
No of the person you contact (Ref: Img 15).
37. Enter the E- Mail id of the person for exchanging any
messages between you and the contact person (Ref: Img 15).
38. After entering the details Click Add (Ref: Img 16).
39. If you want to delete the items click the wanted items to be
deleted and click Remove and give yes in the pop-up Message. Or else give Save
& New (Ref: Img 17).
Img:16

Img:17

40. After completion of adding a customer id B2B you can view and
update it by making a left click in B2B Customer.
41. Enter the Customer Name and Contact Type and give update. Else click Search, all the products entered will be displayed. Select the product to be updated and click update (Ref: Img 18).
Img :18

42. For easy search of the B2B customer we can use the filter option to filter and display the certain categories alone. Click filter -> Enter the State code and Department to be filtered and Click filter. The entered categories will be filtered and displayed (Ref: Img 19).Select the needed list and give Update.
Img:19
Img:20
44. In the displayed list of B2B Customers select the list of
items to be deleted and give Delete option to delete the selected items (Ref: Img
21).
45. To unselect the selected items use Clear option, all
the selected items will be unselected.
46. Price list option is used to set the price for the person as
we have seen before. Follow the steps which represent the Img: 11,12,13,14,15.
Click the price list option to set price (Ref: Img 22)
Img:21
Img:22
47.Hence we have created a B2B Customer successfully.


Comments
Post a Comment